


Description
LX001 Vertical farm
Understanding the hydroponic cultivation process in the vertical farm
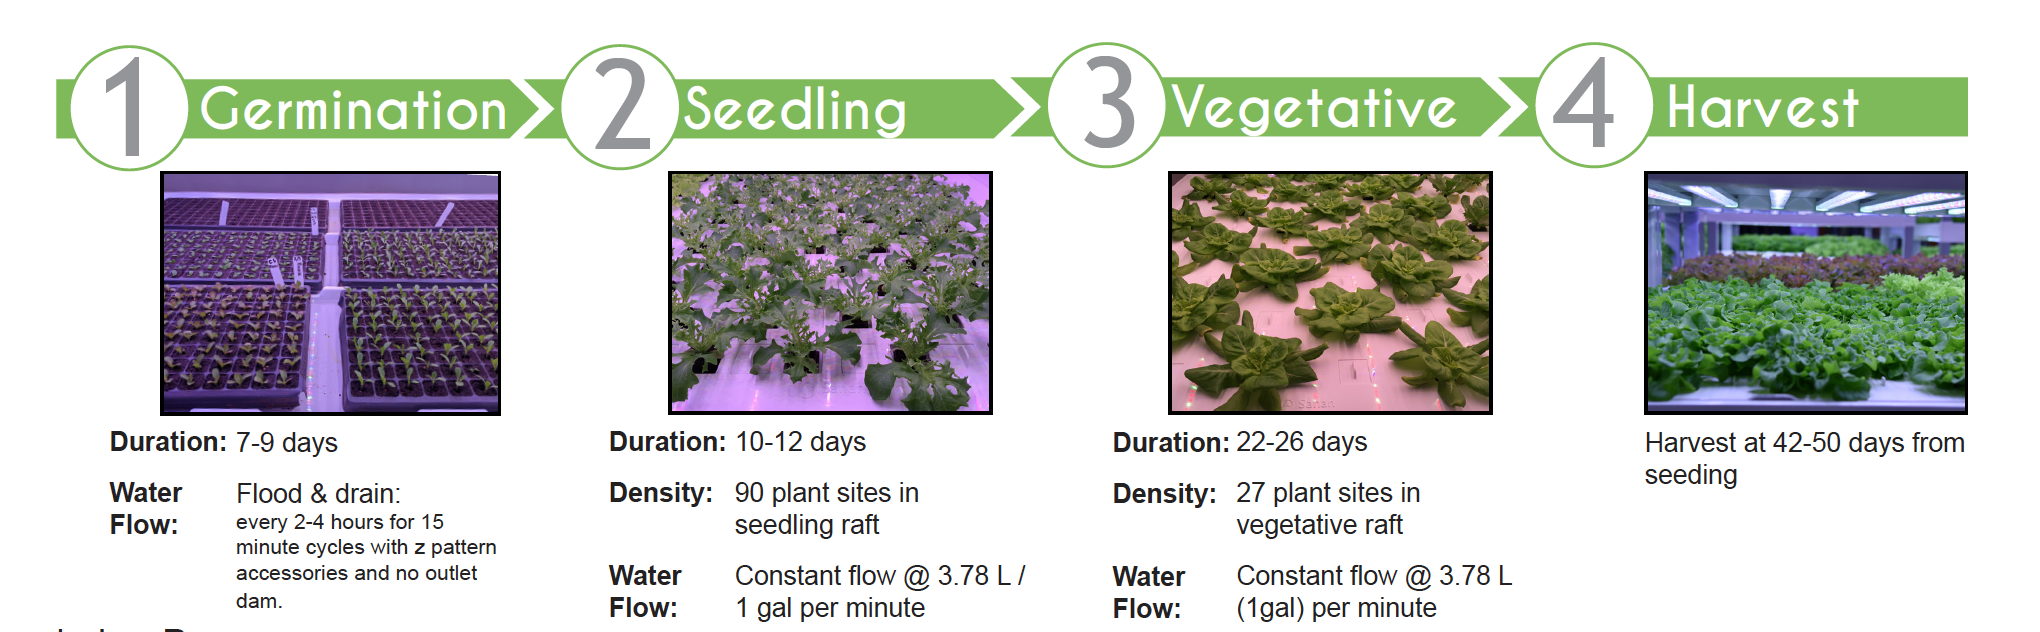
We divide the growing process for baby leaf and full-size greens into phases based on the time required for propagation and vegetative modules. Each growth phase requires different environmental conditions and water quality to achieve optimal results. These conditions are often best met by using separate modules, sanitation systems and rooms, taking into account the size of the operation and the amount of labor required.
These timelines represent a standard cycle for the most common crops grown in vertical farms. This chart provides a link between the time spent in each phase and the necessary steps for labor planning. We see these recommendations as a starting point for Litrax beginners. We encourage farmers to experiment with all the modular components and processes to find what best suits their operational needs.
Module types
The “Propagation” and “Vegetative” modules work together to promote the best growth of leafy greens. We divide the growth stages into different modules to differentiate the light spectrum, the distance between the bed and the light and the plant density as well as the different nutrient quantities, light duration and environmental conditions.
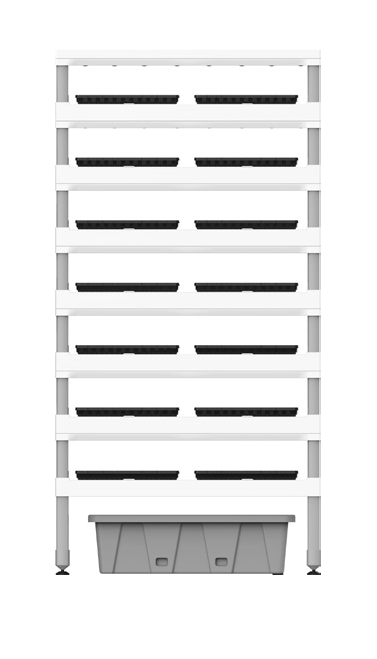
Vegetative module
Key features
- Light spectrum to maximize the size and weight of full-sized plants
- Capacity of up to 108 plant spaces per cultivation bed for the production of whole plants or herbs
- Flat flow mode of 15L / 4 gal per add-on bed
- Expected 14-15 hour light cycle
Contains
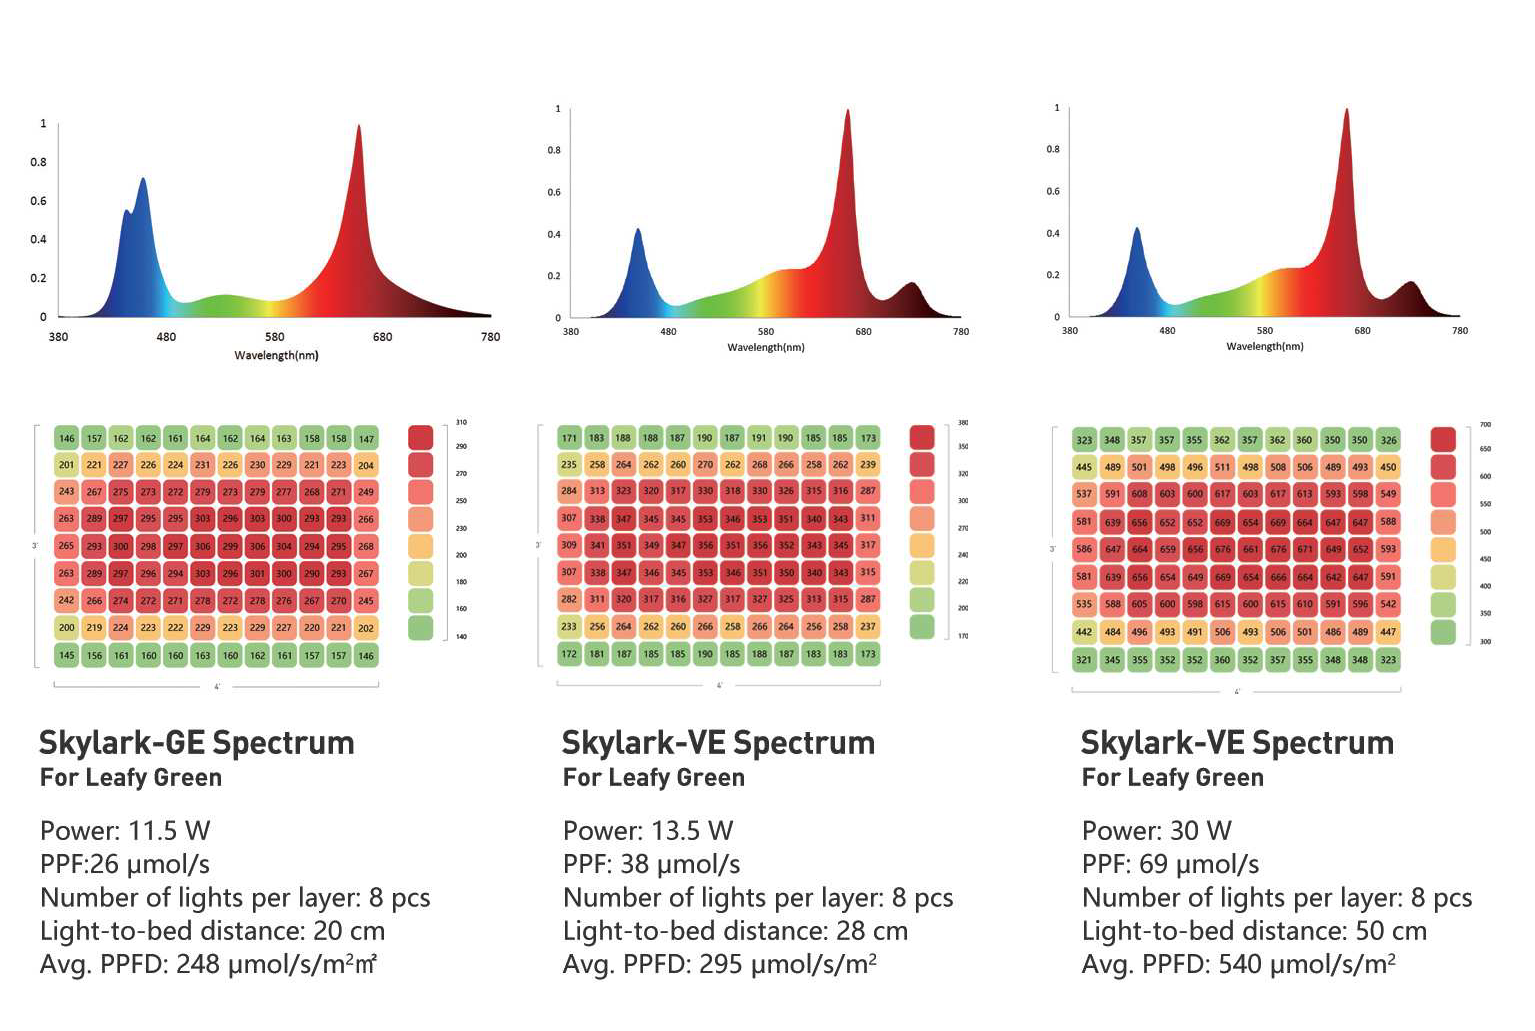
- 32 light strips (4-8 per layer), 13.5 watts per LED light strip
- Light spectrum for mature growth
- 30 cm distance between light and bed
- 54-hole rafts
- 4 levels, expandable up to 7 levels
- 2.2 m to 2.8 m high
Ratio of modules for a perfect vertical farm
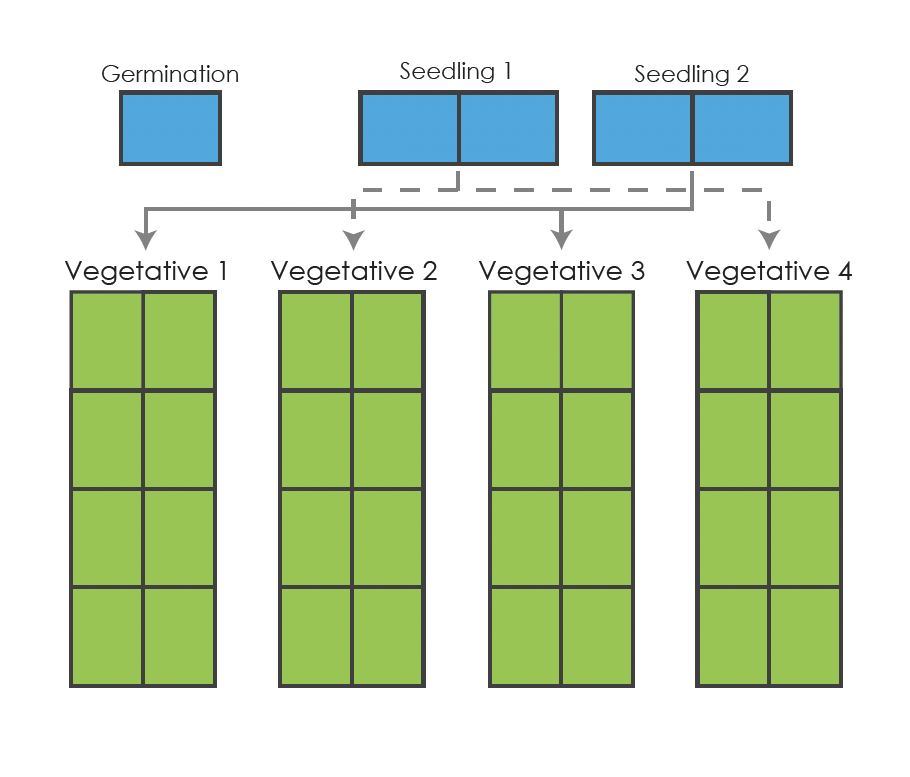
The ratio between the propagation modules (blue in the picture) for seeds and seedlings (microgreens) and the vegetative modules (green in the picture) is as follows: 1 germination module + 8 seedling modules (propagation modules) for 62 vegetative modules This ratio depends on the number of layers in each module, the plant density, the duration of each phase and the expected loss rate. We recommend grouping the modules in each phase in separate zones to increase operational efficiency and reduce cross-contamination.
Example of a small vertical farm with standard proportions, see scheme picture with blue & green modules.
COMPONENTS AND ACCESSORIES
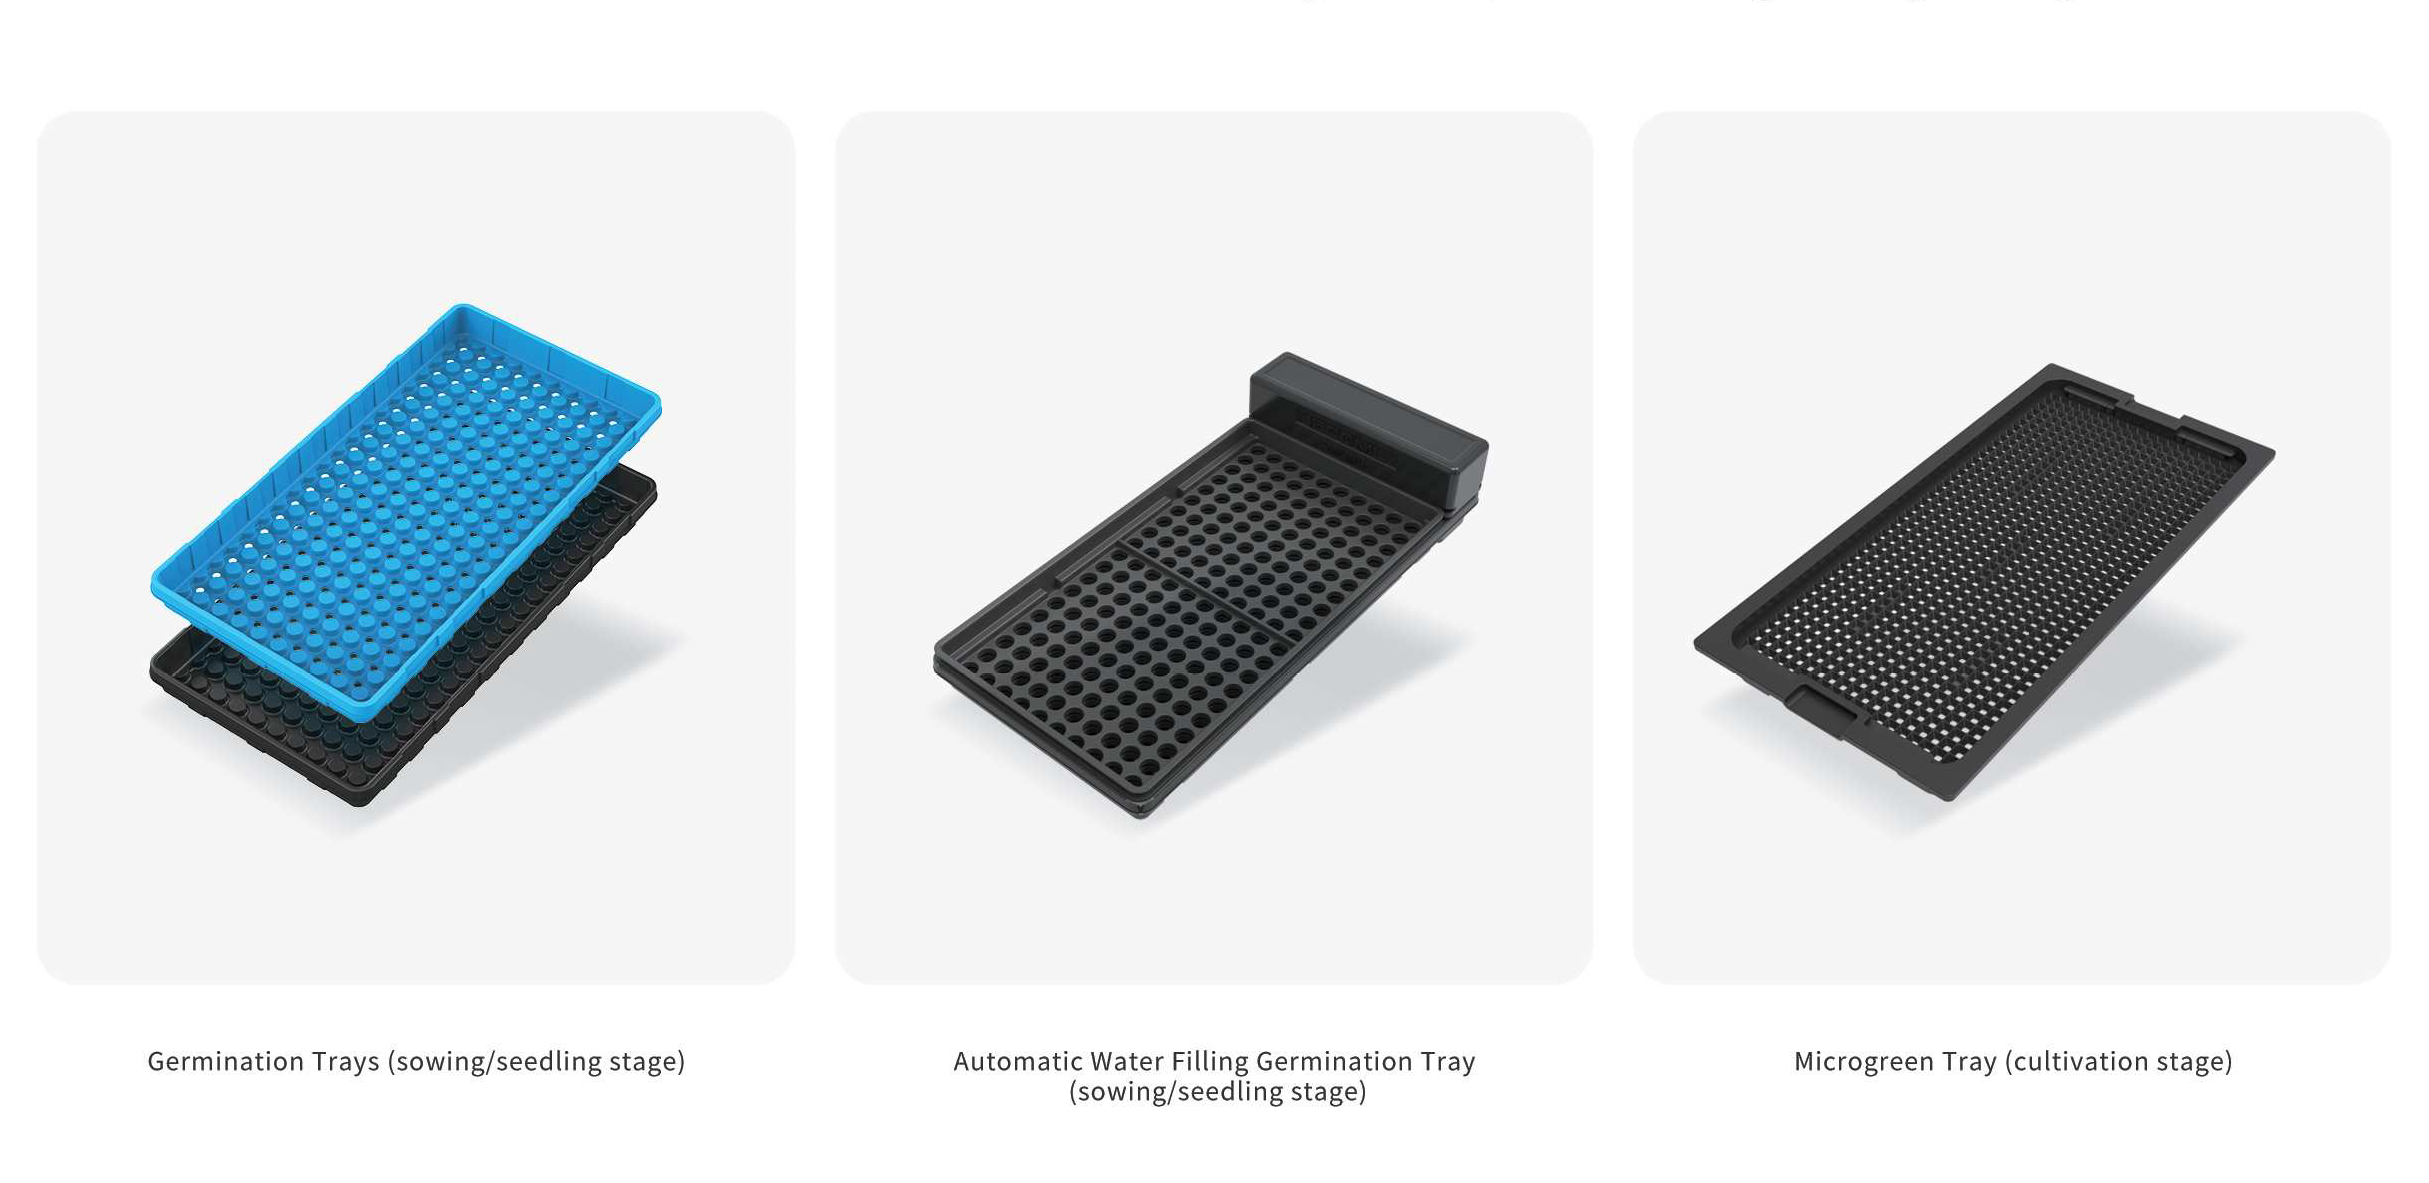
Rafts
Raft caps provide structural support for the plants and are available in two versions to suit the different stages of growth. Raft caps are used to cover unused planting areas. This provides flexibility to meet the requirements of different plant growth habits.
Propagation rafts
180 plant spaces per raft, designed for the nursery phase when the plants need less space.
Vegetative rafts
54 planting spots per raft, for the complete growth of mature leafy vegetables such as lettuce and herbs. The lighting is optimized for rapid leaf growth. Depending on the maturity of the plants, you can apply a low to high growth density, from 15 to 54 plants per raft.
LED grow light options
Light strips
Retrofit any vegetative module to maximize anthocyanin production in red varieties with a proven peak at 450 nm. Simply replace the alternating VE lights with blue lights via quick connectors. This allows for flexible customization of an entire module or a single grow bed.
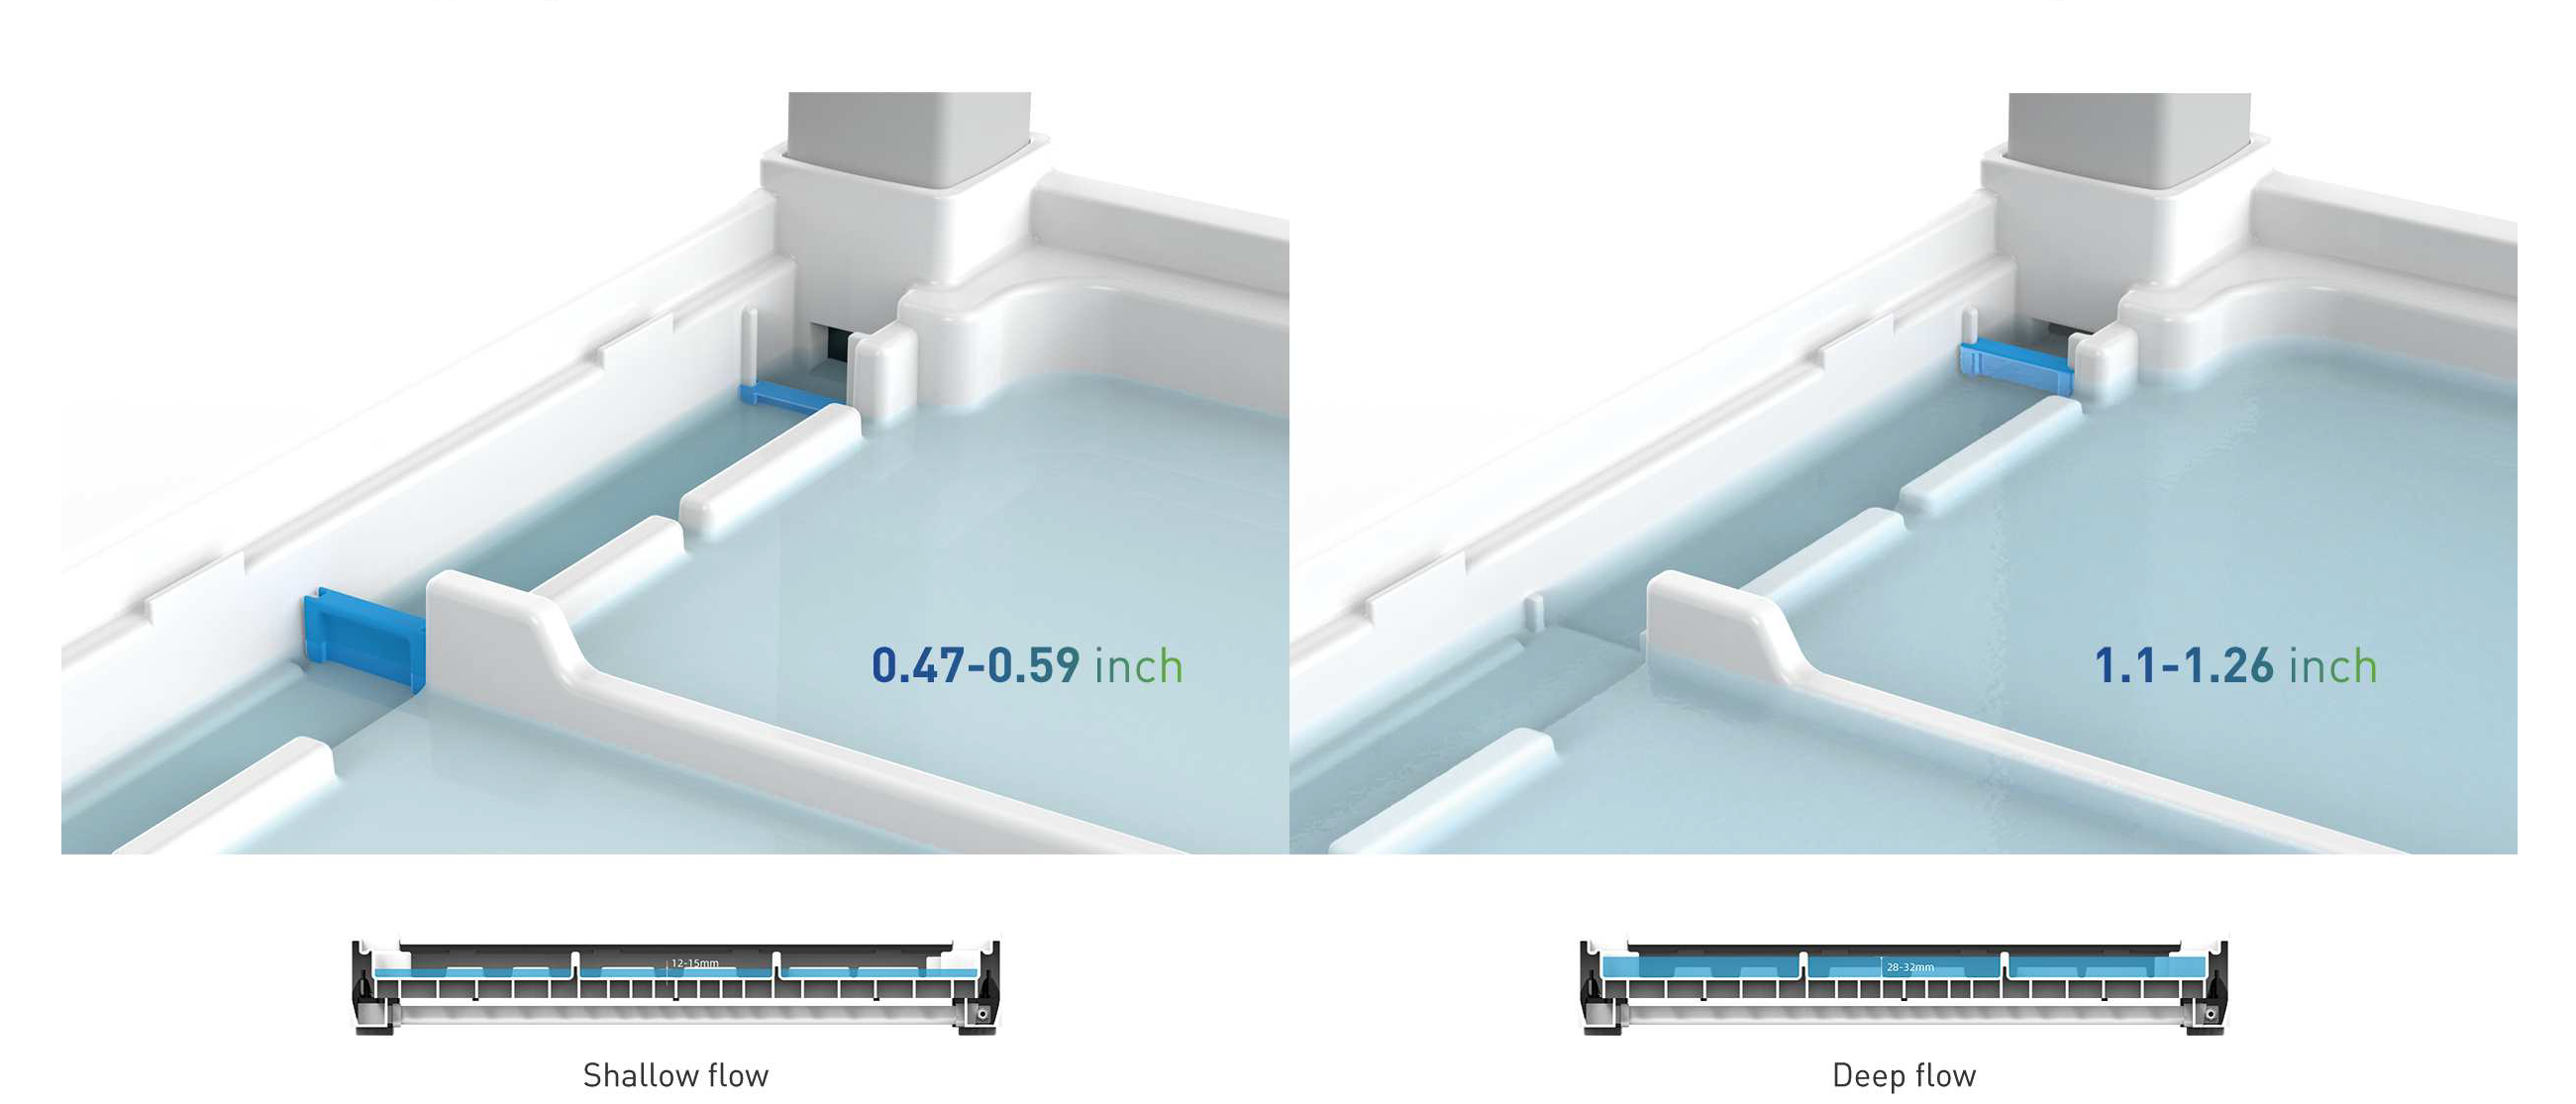
Water flow in modules
The LX001 is designed for a constant water circulation of 3.78 liters (1 gal) per minute per module. External piping delivers water to the top of each module, which flows through the gray spacers from grow bed to grow bed. The external piping directs water from the outlet of the module to the reservoir below the module, from where it is returned to the top of the module or to a nutrient dosing tank.
- Propagation module with deep flow mode (30L / 8 gal.)
- Vegetative module with shallow flow (15L / 4 gal.)
Sanitary facilities & nutrient management
The connection of external pipes to the LX001 is simple, but can be complicated depending on the operating objective and equipment. The design of the piping is linked to the nutrient management system. Nutrient management is one of the first processes to be automated in hydroponic cultivation. The LX001 integrates easily with many commercially available nutrient management systems. Factors that we take into account when planning the sanitation systems:
- Will you have a separate tank room?
- How many modules can be placed in a row
- Which crops will you grow?
- Number of cultivation zones?
- Number of separate tanks to prevent contamination?
- Harvest and cleaning plan?
- Which nutrients will you use?
(we can advise you) - How will you bring fresh water to the modules/containers?
- Where is the water source located?
- What is the capacity of the system for inflowing and outflowing water?
- Are there floor drains?
- What is the quality of the spring water?
PPM, pH value, alkalinity, chlorine? - Will you clean and recycle the used nutrient solution?
- Is water treatment prior to disposal mandatory in your municipality?
Examples of harvest cycles
Whole lettuce
- Day 0: Seed,
- Day 7: Transfer from germination tray to propagation raft,
- Day 18: Transfer from the propagation raft to the vegetative raft,
- Day 42: Harvest
Basil
- Day 0: Seed,
- Day 7: Transfer from germination tray to propagation raft,
- Day 18: Transfer from the propagation raft to the vegetative raft,
- Day 35: Harvest
Baby kale
- Day 0: Seed,
- Day 12: Transfer from the germination tray directly to the vegetative raft,
- Day 24: Harvest
Microgreens (seedlings) and baby leaves for the food service industry
Microgreens
Microgreens are immature plants that are harvested shortly after the germination stage. Microgreens are very popular with growers as they are produced quickly and are often ready to harvest after just 7 to 21 days. A plant is ready to harvest at a height of 2-5 cm. Microgreens are popular with top chefs and gourmets because of their strong flavor and high nutrient content. Microgreens are produced in the germination (sowing) and propagation module. Examples of the harvest maturity of microgreens: Ready to harvest within 7 days: radish, sunflowers, pea sprouts, corn sprouts, buckwheat Ready to harvest within 10 days: rocket, cabbage, choi, kale, mustard cabbage Ready to harvest within 18-21 days: amaranth, basil, carrots, celery, chard, coriander, cress, basil, dill, spring onions, shiso
Baby leaves
Baby Leafs are immature plants that are harvested when the leaves are between 2 and 5 inches tall, when they are at their most tender. Baby Leaves are most commonly grown and packaged for ready-to-eat blends. Pre-prepared blends are the most commonly desired product. Baby Leaves can be grown in Litrax in raft or tray production.
Labor Processes (Labor Process)
Sowing
- Follow the manufacturer’s instructions to prepare the substrate for sowing.
- Plant 1 seed per plug.
- Insert the seed trays with drainage holes into the system.
- Set the pump timer so that the water circulates for 15 minutes every 2-4 hours.
Steps to germination
- Insert the caps into the seedling raft and cover every second planting site.
- Remove the plug from the seed tray.
- Insert the plug into the planting site and make sure that the substrate is firmly in place and that the roots fit through the opening.
Vegetative steps
- Place the raft caps in the vegetative raft covering every other planting site.
- Remove the plug from the seedling raft and immerse it in a clean cup of water to collect the roots.
- Place the plug in the open planting site so that all the roots fit through the opening.
- Insert the raft into the planting bed from top to bottom.
Steps to harvesting
- Remove the rafts from the module by working from bottom to top.
- Place the raft on a clean work surface.
- Use a clean knife or scissors to cut off the base of each plant above the substrate.
- Place the products in a clean harvesting container.


Reviews
There are no reviews yet.